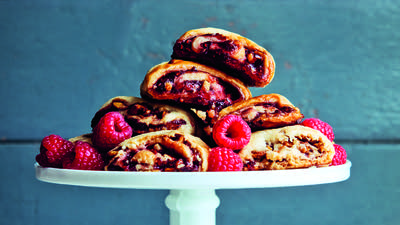
Cooked strawberries are a controversial subject in some circles. I love them, but I agree that there is a right way to cook them. My method is simple enough: Cook them hard and dark. They are at their best when you choose a high-flavor variety with good color, and you cook them until nearly all the water has escaped and they are concentrated and toothsome. Anything less than that and you have the soft, pallid, slippery fruit situation that gives cooked strawberries a bad name.
Ingredients
1 recipe Flaky Butter Crust (see below), undivided
All-purpose flour, for rolling
1 pound (453g) fresh strawberries, hulled and quartered
1/2 cups (400g) Vanilla Bean Sugar (see below)
2 tablespoons cornstarch
Zest of 1 lemon
1/2 teaspoon kosher salt
1/2 cup (118ml) heavy cream
1 large egg, beaten, or 3 tablespoons buttermilk, for brushing
Coarse sanding sugar, for sprinkling
 Dappled
by Nicole Rucker
Directions
1. Line two baking sheets with parchment paper.
2. Divide the pie dough into 8 equal-size pieces. If your dough has been chilled overnight, it will need to sit at room temperature a bit before rolling—this will take 10 to 15 minutes. Lightly flour your work surface and roll out each piece to a 7-inch round (or something close to round) just shy of 1/4-inch thickness. Transfer the dough rounds to the prepared baking sheets, placing 4 on each sheet.
3. In a large bowl, combine the strawberries, vanilla sugar, cornstarch, lemon zest, and salt. Place a heaping 1/3 cup of the berry mixture on each dough round, leaving a 1 1/2-inch border. Fold the edges of the dough up over the filling in loose pleats, leaving the fruit exposed in the center of each galette. Gently arrange the galettes on the baking sheets so they’re several inches from one another.
4. Refrigerate or freeze the galettes until the dough is firm, about 20 minutes in the fridge or 10 minutes in the freezer.
5. Position two racks in the center zone of your oven and preheat the oven to 400°F.
6. Pour 1 tablespoon of cream in the opening of each galette. Brush the edges of the dough with the egg and sprinkle each galette with sanding sugar.
7. Reduce the heat to 375°F. Bake until the crusts are golden brown, about 30 minutes. Rotate the pans top to bottom and front to back and continue to bake until the juices bubble from the center of each galette, about 15 minutes more. Transfer to a wire rack and let the galettes cool completely before serving. Store at room temperature in a sealed container for 1 day or up to 1 week in the fridge.
Note:
Make the Flaky Butter Crust 2 to 24 hours in advance so that it can be properly chilled prior to rolling.
A basic knowledge of galette construction means that you can adapt these to pretty much any fruit. Juicier fruits such as other berries, cherries, or very ripe stone fruits need the thickening agent more so than a classic apple galette (you can reduce the cornstarch to 2 teaspoons for apples). Try a version with a base layer of Almond Cream (see Almond Cream recipe on this related page) spread over the bottom of the dough before arranging the fruit—it adds richness and height to the rustic dessert.
FLAKY BUTTER CRUST
Makes two 9 1/2-inch single crusts or 1 double crust with some dough left over for lattice work or other decoration
When I set out to develop my own pie dough recipe, I scoured my cookbook collection for unique recipes from which to find inspiration. There were so many recipes, all claiming to be the “flakiest,” “butteriest,” “best ever,” but most of them followed a traditional formula of cold fat, cold flour, and cold water. Some recipes called for vinegar, others swore by vodka. The vinegar intrigued me, mainly because I love vinegars and have quite a col¬lection of them—a vinegar for every kind of recipe calling for acid.
When I dug further into the vinegar lead, I found that two recipes containing vinegar came out with excellent results. Though both needed tweaks to make them my own and adjust them to my taste, they each resulted in shattering flakes with great butter flavor and uniform color. One of the recipes was from Bourke Street Bakery in Sydney, Australia—and in that recipe, the authors actually dissolve the sugar in the water with the vinegar.
This was a lightbulb moment—dissolving the sugar in the liq¬uid with vinegar creates a syrup that permeates the dough thor¬oughly. The color after baking is intense and the flavor and aroma of the cooked crust is a dish all its own.
Making pie goes back hundreds of years. The basic ratio of fat to flour wavers very little from recipe to recipe and the tech¬nique remains mostly the same, but the addition of vinegar adds a layer of tenderizing magic that shortens the production of glu¬ten strands. Gluten is a friend in pie dough, but too much gluten makes for an inedible brick.
I prefer to use a vinegar with flavor, like unfiltered apple cider vinegar, as well as dark brown sugar for even more flavor and caramelization. Brown sugar is also considered to be an acid, and so it has similar tenderizing abilities as the vinegar, which means that this pie dough recipe is incredibly forgiving and has become one of my most consistent recipes. The raw pie dough tastes sea¬soned, as it should in my opinion.
You can make pie dough with your hands, you can cut the fat into the flour with a pastry cutter, you can squish the butter chunks into the flour with a rolling pin—there are as many methods for incorporating fat into flour as there are bad pie dough recipes. I stand by my simple pinch and smear method, and though there are plenty of ways to shortcut things, the handmade method works the best for me and for the team of bakers that make perfect pies at my bakery. I think that you can tell the difference between a hand-processed crust and a machine-processed crust. A crust made by hand will have a texture that is tender, and the outer edge will have visible layers and flakes when you cut into the slice. There will be less uniformity, but that’s the charm of a pie.
Ingredients
1/4 cup (50g) packed dark brown sugar
1 tablespoon unfiltered apple cider vinegar
1 1/2 teaspoons fine sea salt
4 cups (500g) all-purpose flour, plus more for surface
3 sticks (339g) unsalted butter, cold and cut into 1/2-inch cubes
Directions
1. In a measuring cup, combine the brown sugar, vinegar, and salt with ¾ cup (107ml) of hot water. Stir until the sugar has dissolved. Chill the liquid in the freezer until it is very cold (this should take about 20 minutes) and leave it in the fridge until you are ready to start the rest of the dough.
2. Combine the flour and half of the butter in a large mixing bowl. Pinch and smear the butter between your fingers. Processing the butter like this creates small leaves of butter that layer in the dough, resulting in flakes later. Once all the butter chunks have been pinched, grab small handfuls of flour and butter and rub the two together between the palms of your hands until the mixture resembles uneven pebbles on a sandy beach.
3. Dump the crumbly mixture out onto a lightly floured work surface. Scatter the remaining half of the cold butter over the dough. Use the palm of your hand to smear the butter as if you were sliding a secret message across a table. Use a bench scraper to gather the shaggy dough and repeat the smearing process until you have a pile of striated rubble. The larger pieces of butter will create a marbled dough and will melt during baking, causing the water in the butter to evaporate (this will result in flaky pastry pockets).
4. Gather the buttery mixture up in a mound and form a well in the center. Remove the cold liquid from the fridge and pour half of it into the well. Using your fingertips, slowly bring the flour and butter into the center and combine it with the liquid, until the liquid has been incorporated. Gather the moistened dough into a pile.
5. Slowly pour the remaining liquid onto the shaggy mess. Lift the dough from the bottom and squeeze just until it comes together into one mass. Divide the ball in half and shape each half into a disc. Wrap each in plastic and chill for 2 hours before using.
VANILLA BEAN SUGAR
When I think of making flavored sugars and storing them for future baking projects, I imagine myself as a sort of potion maker. Mixing a little of this and a little of that, storing it, and pulling it out later to match with a fruit or a custard base. When you use the seeds from a vanilla bean pod for cookies or custard, you are left with an empty seed pod. Keep this “discarded” pod in the freezer. It should never, ever be thrown in the trash! The price of vanilla beans and the length of time required to get from flower to extract makes them one of the most valuable edible commodities on the planet, and we must use every inch of the pod to honor its journey.
Ingredients
2 vanilla bean pods, (you can use pods that have been previously scraped of their seeds)
2 cups (400g) sugar
Directions
Lay the pods on a baking sheet and dry them slowly in a 200°F oven or a dehydrator for about 1 hour. Once they are brittle and dried, combine them in a food processor with 1 cup of sugar per bean pod. Pulse the machine until you have a well-speckled sugar. Sift out any larger, unprocessed pieces if you like a more uniform sugar. I prefer to leave them all in and pick them out if I’m making a cookie or cake with the sugar.
You can use this flavored sugar for anything you would use vanilla and sugar in. Substitute it cup for cup in your recipe but omit the vanilla paste or extract in the recipe, as the sugar will be potently perfumed. Keeps indefinitely.
Reprinted from Dappled by arrangement with Avery, an imprint of Penguin Publishing Group, a division of Penguin Random House LLC. Copyright © 2019, Nicole Rucker.
Before you go...
Each week, The Splendid Table brings you stories that expand your world view, inspire you to try something new and show how food brings us together. We rely on you to do this. And, when you donate, you'll become a member of The Splendid Table Co-op. It's a community of like-minded individuals who love good food, good conversation and kitchen companionship. Splendid Table Co-op members will get exclusive content each month and have special opportunities for connecting with The Splendid Table team.
Donate today for as little as $5.00 a month. Your gift only takes a few minutes and has a lasting impact on The Splendid Table and you'll be welcomed into The Splendid Table Co-op.


